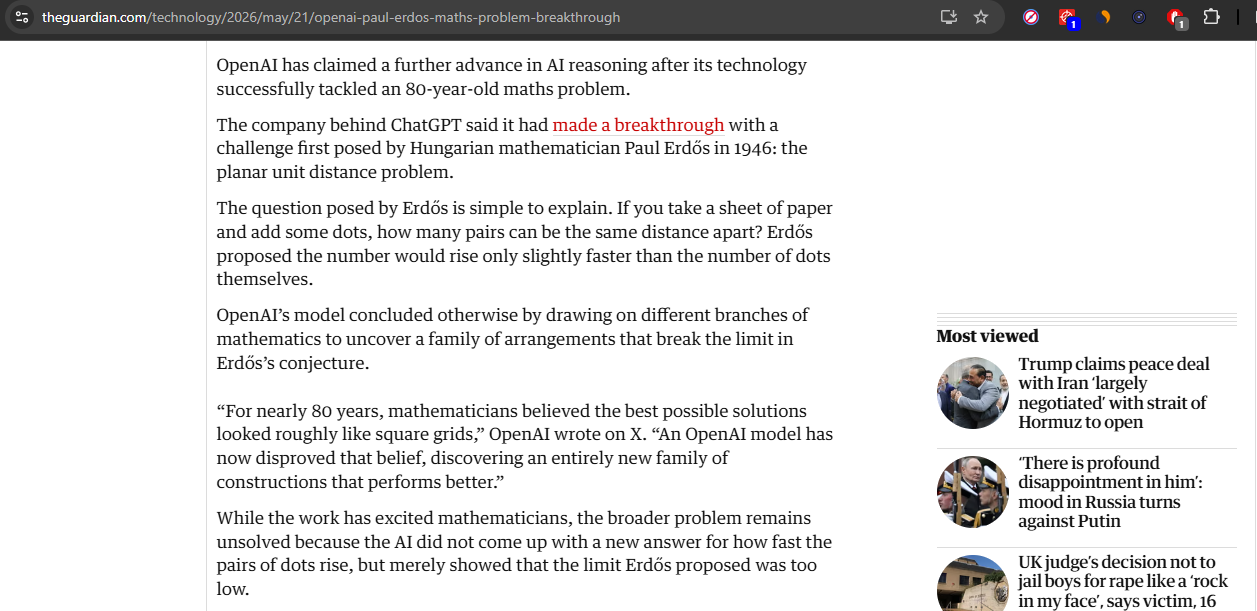
A friend sends you a screenshot of a contract. There's a clause you want to quote in a reply, but the screenshot is an image, not selectable text. So you start retyping. By the third line you've made a typo, by the fifth you've given up.
The category of "image with text inside it that you wish you could select" is bigger than you'd think. A photo of a sign. A scanned receipt. A meme. A slide from a conference talk. An old PDF that was scanned rather than typed. A frame from a video. A whiteboard photo from a meeting. A page of lecture notes you took on paper. Any time the words are there but you can't grab them.
Every VZLyze paid plan (Starter, Pro, and Business) includes a text-extraction system you can point at any image. Two buttons drive it: Extract Text for printed content, and Extract Handwriting for cursive and handwritten notes. They share the same capture flow and the same result panel. You pick the one that fits what's in the image, and the system reads the text and hands it back.
Capture the area with the text
Click the VZLyze icon in your Chrome toolbar. You'll see capture options for full page, visible area, or a drawn region. For text extraction, the region capture is usually the right choice. Drag a box around the words you want, let go, and the screenshot lands in the popup.
Anything visible on your screen can be the source. A screenshot, a photo, a PDF page rendered in the browser, an image embedded in a tweet, a slide from a deck, a video paused on a frame with text on it.

Pick the button that matches the source
Once the capture is in the popup, two options sit next to each other in the menu. Press Extract Text when the source is printed: articles, code, prices, slide content, document scans, signs, screenshots of conversations. Press Extract Handwriting when the source is handwritten: lecture notes, a whiteboard photo, a signed form, a recipe card. If the result comes back wrong or messy, the source probably belonged to the other button. Swap and try again.
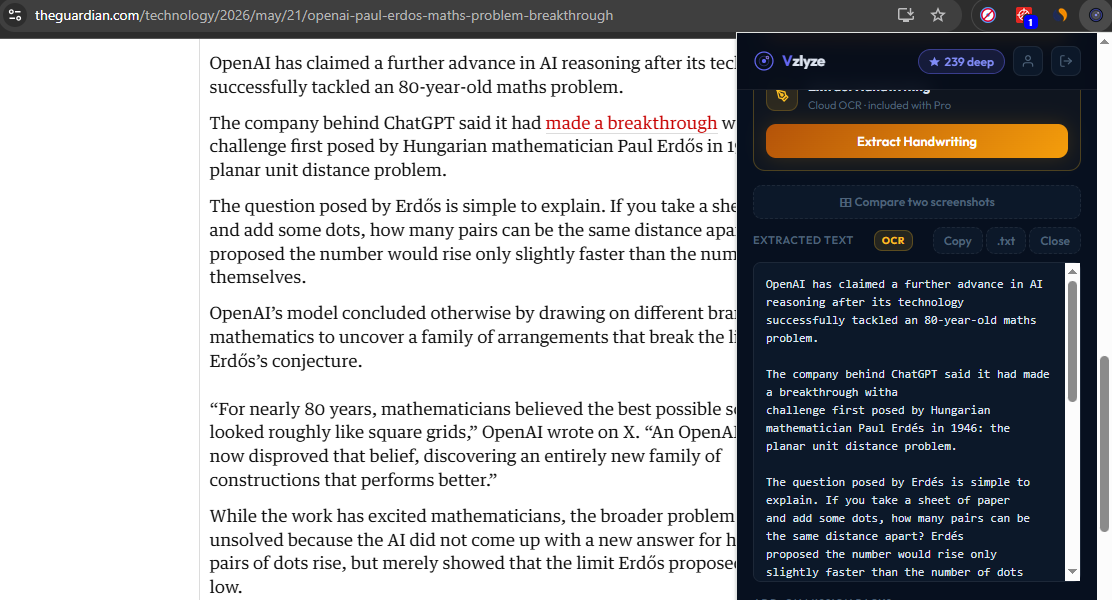
Both buttons drop their output into the same result panel. From there you can copy the text to your clipboard, paste it into a document, or include it inside a PDF report alongside the screenshot it came from. If the capture turned out to be a table rather than a paragraph, Extract as CSV is the right follow-up. It preserves rows and columns instead of returning a flat blob of text.
Why text extraction sits on Pro
Extract Text and Extract Handwriting are two halves of the same OCR pipeline inside the extension. Two engines, one capture flow, one result panel. The work behind keeping printed and handwritten content covered cleanly is the kind of thing that doesn't show up free in other tools. That pipeline is what every paid plan includes.
The plan is built for people who do this more than a couple of times a year. Researchers pulling quotes out of scanned papers. Journalists cleaning screenshots out of an interview prep folder. Support engineers reading customer screenshots into a reply. Lawyers digging text out of contracts that arrived as PDFs of PDFs of PDFs. Students with whiteboard photos and slide decks to study from. For people in that group, text extraction stops being a one-off and becomes a daily tool. The first afternoon you stop retyping a stack of slides into a doc, the plan has paid for itself.
Paid plans also cover unlimited screenshot capture, PDF report export, AI analysis credits, and the editor with annotation tools. Pro and Business add Research Missions and Debug UI. Business adds side-by-side Compare for product research. The OCR pipeline is one piece of that.
What we use it for
A mix of practical notes and real examples from the last couple of weeks:
- Extract Text is fast. Small captures come back almost instantly, and a long full-page screenshot takes a few seconds. No spinner-watching while a cloud roundtrip happens.
- Sensitive content stays on your device when you use Extract Text. For IDs, contracts, screenshots of private messages, or receipts with card numbers, that's the path to reach for.
- Copying a paragraph out of an article that was rendered as an image because the site does that to block scraping.
- Pulling text out of a meme to search for the original quote.
- Grabbing the WiFi password from a photo of the back of a router.
- Extracting a phone number from a screenshot of a business card.
- Reading the text of a slide from a conference talk video, so we could quote it in a write-up.
- Getting an address off a delivery label photographed by a customer, without uploading the label image to anyone.
Where it falls short
The biggest miss is mismatching the button to the source. Pressing Extract Text on a page of cursive will return gibberish, and pressing Extract Handwriting on a clean printed paragraph spends a credit on a job the other button would have handled. Look at what you captured before you click.
Heavy stylization causes trouble for both engines. Display fonts with lots of texture, neon signs photographed at night, ornate logos. The handwriting engine handles stylization slightly better than the printed-text one, but neither is reliable when the visual noise is high.
Mixed languages are another limitation. The printed-text engine is tuned for English and handles common Western languages reasonably, but pages in Chinese, Arabic, or other non-Latin scripts will need a different tool. Very low contrast is also a problem: light grey text on a slightly lighter grey background is technically visible to your eye but the engine struggles to separate the two.
For the printed and handwritten content most people throw at it (articles, code, prices, signs, screenshots of conversations, receipts, document pages, lecture notes, whiteboard photos), it just works.
Get the full toolkit
Extract Text and Extract Handwriting are unlocked on every paid plan. Extract Text runs locally at no credit cost. Extract Handwriting uses one Quick credit on Starter and one Deep credit on Pro or Business. See the pricing page for what each plan bundles.
See pricing