A screenshot without context is half a message. You send a teammate a capture of a broken UI and the reply is "what am I looking at?" You forward a pricing page to a client and they ask "which row do you mean?" The picture itself is fine. What's missing is the red circle around the thing that matters.
The usual fix is to open Preview, Paint, Skitch, or whatever screenshot editor is installed, paste the image, draw an arrow, save it, and come back to the conversation. Vzlyze cuts that loop out. Annotation lives inside the same popup where you captured the screenshot.
How to open the editor
Visible area, full page, or selection. Any capture mode works. The annotation editor opens against whatever screenshot is currently loaded in the popup.
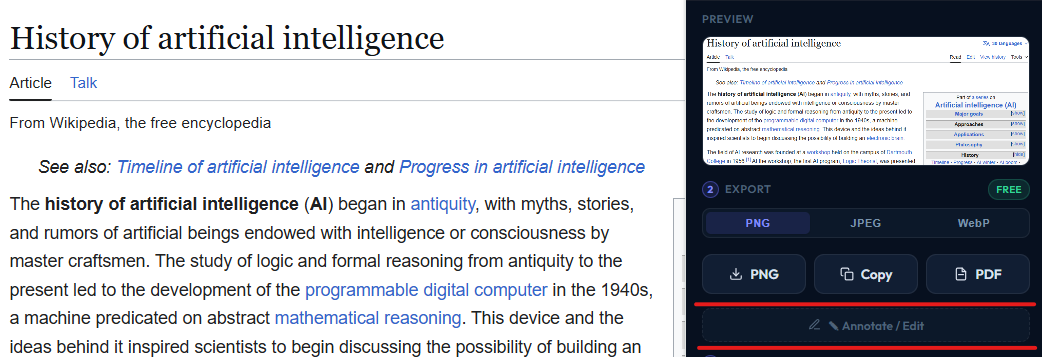
The button sits below the screenshot preview, alongside the analysis controls. Clicking it swaps the popup view to the editor with your screenshot loaded onto a canvas.
Pick a tool, pick a color, draw. Save when you're done. Cancel if you want to throw away the changes. Saving writes the marked-up image back to the popup, replacing the original.
What each tool is for
Pen. Freehand drawing. Good for circling a region that doesn't fit a clean rectangle, scribbling a path through a diagram, or quick "this part" loops. Pressure-sensitive on stylus, plain weight on mouse.
Arrow. A straight line with an arrowhead at the end. The single most useful tool in this list. Use it for "look at this," "this caused that," and any time you want to direct a reader's eye to one specific spot.
Rectangle and ellipse. Outlined shapes. Rectangles work well around buttons, error banners, and table cells. Ellipses are better around faces, irregular regions, or anything where a rectangle feels too formal.
Highlight. A semi-transparent stroke that sits over the image instead of replacing it. The equivalent of a yellow highlighter on paper. Use it for paragraphs of text, headings, or anywhere you want emphasis without hiding what's underneath.
Text. Click to place, type, press Enter to commit. Each text annotation gets a small white background pad so it stays readable over busy parts of the image. Use it for inline labels ("1," "2," "3"), captions, or short call-outs.
Blur. Pixelates a rectangular region. Drag across anything sensitive (email addresses, account numbers, names, faces) and the area gets reduced to indistinguishable blocks. The blur is real pixelation, not a soft Gaussian blur that can be reversed; the original data inside the region is gone once you save.
Crop. Drag a rectangle and the screenshot is trimmed to it. Use this to focus on the relevant region and drop everything around it. Crop is the one destructive tool: once you crop and save, the part you cropped away is gone from the editor session.

Color, stroke, undo, redo
Six colors sit to the right of the toolbar: red (default), orange, green, blue, black, white. Stroke width is a dropdown next to the colors. Most arrows and rectangles work well at the default thickness; bump it up for screenshots that will be viewed on a TV or projected.
Undo and redo work on every annotation as a separate operation. Arrow you didn't like? One click. Five marks you want to drop? Five clicks. The stack is preserved until you Save, at which point everything flattens into a single PNG and the undo history is gone.
What happens after you save
Saving replaces the original screenshot with the annotated version. Everything downstream uses the new image. If you run a Quick or Deep analysis, the AI sees your annotations and can refer to them in its summary. If you export to PDF, the report shows the annotated image. If you create a share link, the recipient sees the marked-up version. If you copy to clipboard with Alt+Shift+C, the clipboard gets the annotated PNG.
Cancel does the opposite. Your screenshot goes back to its unmarked state and the editor closes.
Where it falls short
A few caveats worth knowing about.
Once you Save, annotations get flattened into a single PNG. You cannot go back to the editor and tweak the third arrow you drew, because the editor no longer knows it was a separate arrow. If you might want to revise something, Save makes a commitment. The workaround is to capture again from the source and redo, or to keep the editor open longer before committing.
Cropping resets the ops stack. Crop, and the parts you cropped away are gone; further annotations sit on the smaller image. This is faster and predictable but it does mean crops are the one tool you should treat as final inside a session.
There is no layering or grouping. Every annotation is an independent operation in a flat stack. For most use cases this is fine, but if you want to nudge a label two pixels right after placing it, the answer is undo and re-place rather than drag.
The editor is desktop Chrome only. There is no mobile annotation flow because there is no mobile capture flow.
Try the annotation editor
Capture any page, click Annotate / Edit, and start marking it up. Starter, Pro, and Business plans include the full toolset.
Get VZLyze for Chrome